One of the first things organizations do once they upgrade to a M365 license type that includes Microsoft Entra ID P1 is to start rolling out Conditional Access Polices to incorporate fine-grained security polices. However, after that, an attractive feature, especially for organizations with a hybrid environment, is the Self-Service Password Reset (SSPR) feature.
Overview
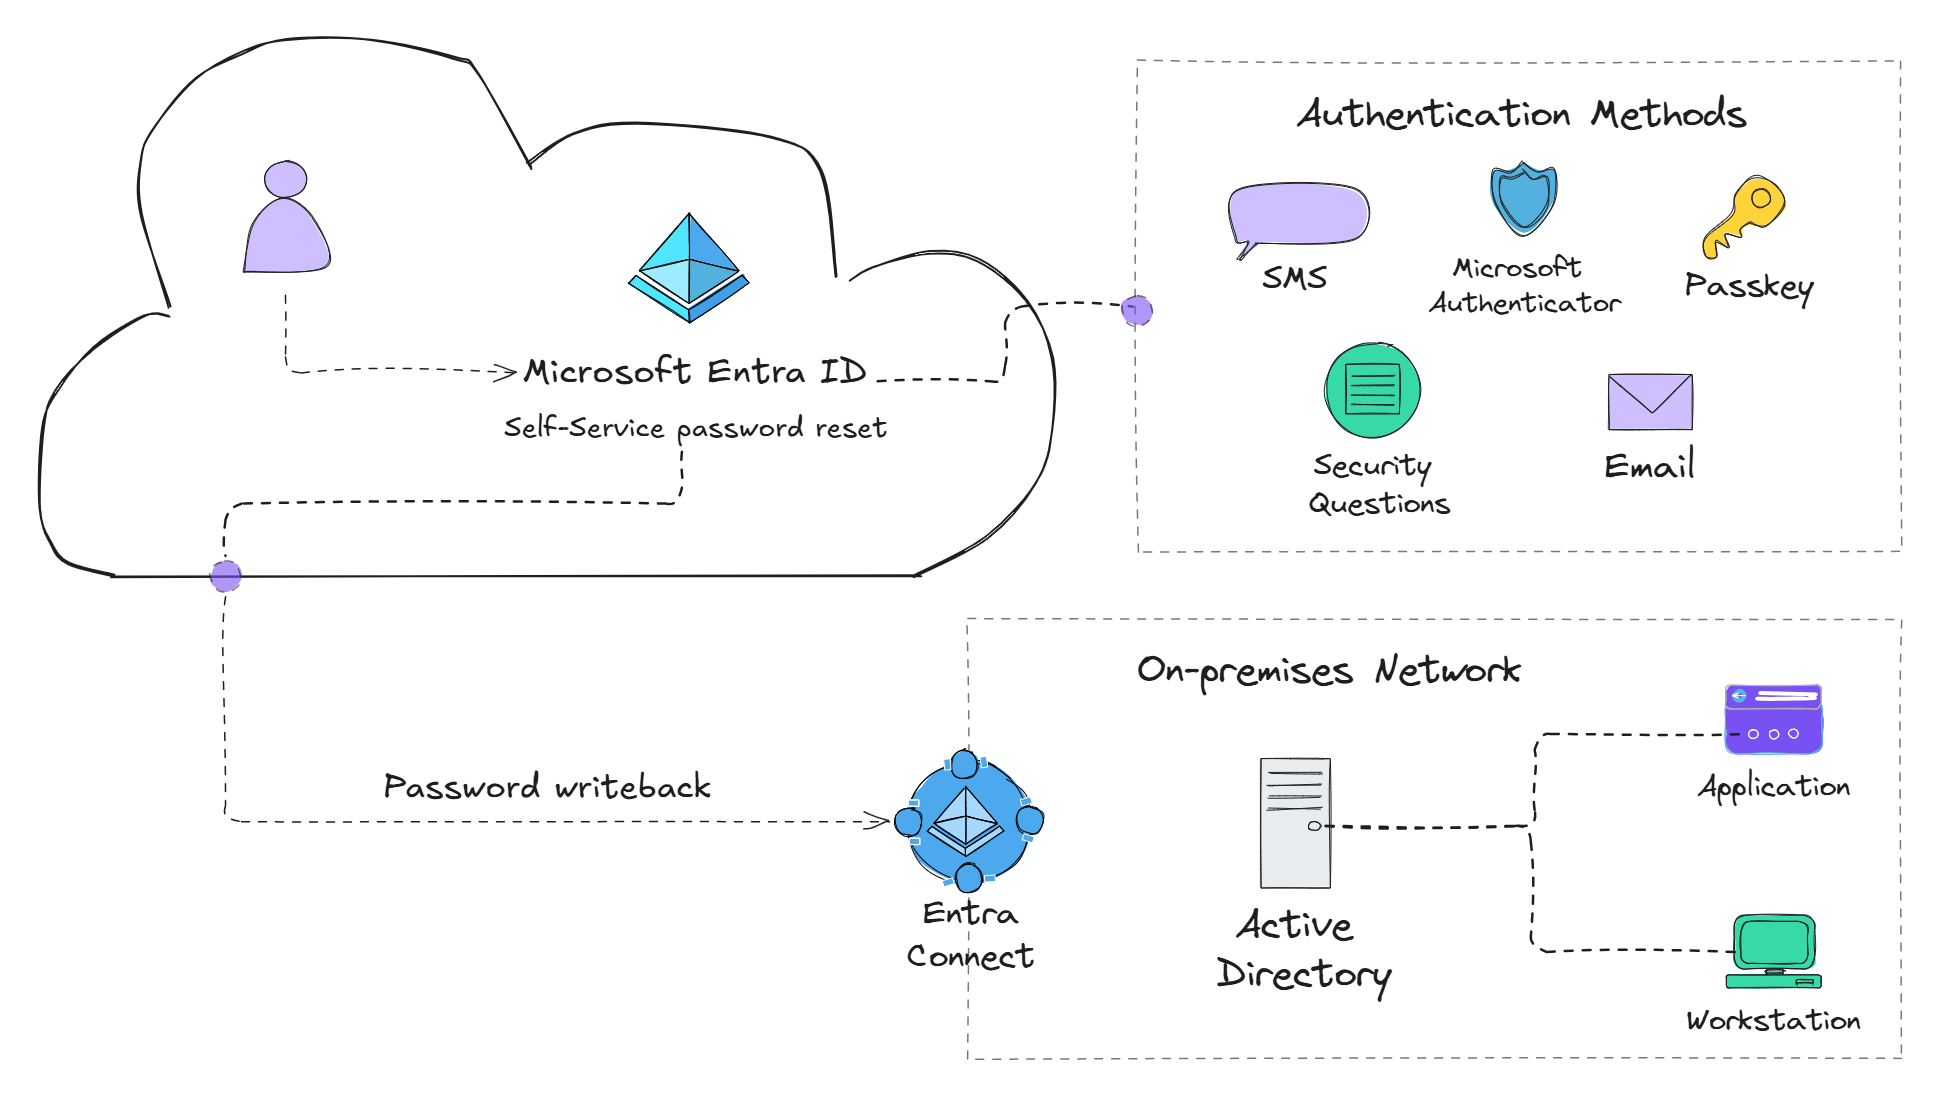
By default, Microsoft Entra ID Free allows password hash synchronization from on-premises Active Directory (AD) to Entra ID. However, any password changes made in Entra ID are not synced back to on-premises AD — essentially making it a one-way sync.
With Entra ID P1 or higher, you can enable password writeback via Entra Connect, allowing password changes in Entra ID to sync back to on-premises AD. This is a game-changer for hybrid organizations, as it lets users securely reset their passwords from anywhere — even if they are off the corporate network.
In this guide, I’ll show you how to gradually roll out SSPR in a hybrid environment using PowerShell to streamline the deployment process.
Prerequisites
Before getting started, ensure you meet the following requirements:
✅ Microsoft Entra ID P1 or higher (for password writeback)
🔗 Entra Connect set up and syncing with AD
🛡️ Hybrid Identity Administrator role (minimum permission needed)
Step 1: Create an Active Directory security group and enable password writeback with Entra Connect
- Create a new security group in Active Directory that will contain the users you want to enable SSPR for. For instance, create a group called SSPR-Enabled-Users.
Make sure the security group resides in an OU that is being synchronized to Microsoft Entra ID using Entra Connect.
- Open the Entra Connect wizard to enable password writeback.
- Navigate to Entra Connect > Configure > Customize synchronization options and click Next.
- Enter the Hybrid Identity Administrator or Global Administrator credentials and click Next.
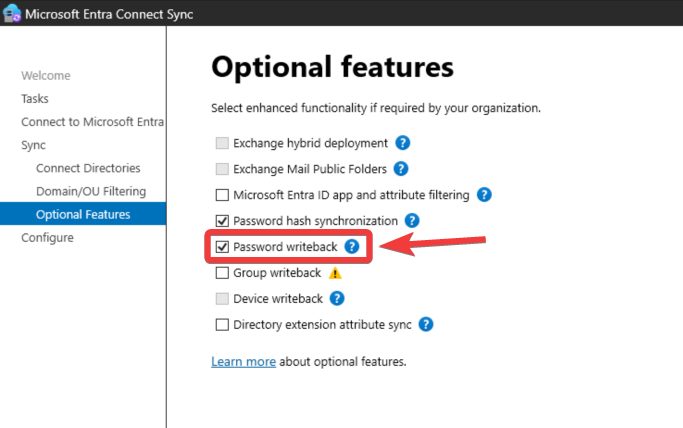
- Click Next until reaching the Optional Features section. Select Password writeback and click Next.
- Click Configure and once the configuration is complete, click Exit.
Verify synchronization is working properly by creating a test user and running a Delta sync Start-ADSyncSyncCycle -PolicyType Delta.
If you don't already have the ADSyncTools PowerShell module installed, you can install the module by running the following command:
[Net.ServicePointManager]::SecurityProtocol = [Net.SecurityProtocolType]::Tls12
Install-Module -Name ADSyncTools
Step 2: Enable SSPR in Microsoft Entra ID
As of writing this guide, SSPR supports adding only one Microsoft Entra group or all users. Nested groups are supported for wider deployments; however, nested groups aren't necessarily helpful, because one, coming from an on-premises environment, most departments are separated by Organizational Units (OUs) and not groups. Secondly, creating additional groups for the sake of gradually rolling out SSPR can be cumbersome and difficult to manage.
- Navigate to the Microsoft Entra portal and sign in with an account that has the minimum role of Hybrid Identity Administrator.
- Navigate to Protection > Password Reset > On-premises integration to verify Microsoft Entra ID is detecting password writeback properly configured with the on-premises Entra Connect.
- Navigate to Protection > Password Reset.
- Under Manage > Properties, toggle Self service password reset enabled to Selected.
- Select the SSPR-Enabled-Users group you created in Step 1.

- Click Save.
At this point, we can stick primarily with the default settings; however, you can customize the Authentication methods to suit your organization's requirements. Additionally, setting the Number of methods required to reset to 2 can add an additional level of security to SSPR.
On-premises Active Directory password polices such as the default domain password policy or fine-grained password polices will apply to Microsoft Entra ID password resets. For password writeback to work most efficiently, the on-premises password policy for minimum password age should be set to 0.
Why does this matter? Let's say the on-premises password policy has the minimum password age set to 1 day. If a user calls in to the help desk to have their password reset and the help desk provides the user with a temporary password (Yes... even with SSPR enabled, this will still occasionally happen 😒). The user will not be able to use SSPR to change the password to something only they would know immediately after receiving the temporary password. The user will have to wait until the minimum password age of 1 day has passed. This can lead to confusion and frustration for users.
Add additional authentication methods
To add additional authentication methods for SSPR, navigate to Protection > Authentication methods > Policies to enable additional authentication methods that can be used with SSPR. Keep in mind that these enabled authentication methods will apply to both Multi-Factor Authentication (MFA) and SSPR since Microsoft Entra ID now uses Combined Registration to allow users to register for both MFA and SSPR at the same time.
Step 3: Create a PowerShell script to gradually add licensed users associated with OUs (Departments) to the SSPR security group
Now for the fun part! 🎉 Let's write some PowerShell 🤖 to automate the gradual rollout of SSPR to users associated with OUs.
The machine running this PowerShell script will need the Active Directory PowerShell module installed. This module is included with the Remote Server Administration Tools (RSAT).
From an elevated PowerShell session, run the following command to install the module:
Install-WindowsFeature RSAT-AD-PowerShell
- First, a little preparation. Navigate to the Microsoft 365 admin center and download a list of users licensed with Microsoft Entra ID P1 or higher. While all users in the tenant can technically use SSPR as long as at least one Entra ID P1 license is available, only those with Entra ID P1 or higher should utilize it to remain in compliance with licensing requirements. A CSV file can be downloaded by navigating to Users > Active users > Export users.
Make sure to remove any non-licensed users from the CSV file exported from Microsoft 365 admin center.
- Next, lets create a CSV file that contains the OUs. We can use PowerShell 😎 to accomplish this. After the CSV file has been created, add a column named
SSPRGroup — this will be needed for the PowerShell script we will be creating. Once the script adds users from an OU to the SSPR-Enabled-Users security group, the script will add the value Added to the OUs corresponding SSPRGroup column. This way, the next time the script runs, it will move on to the next OU that needs evaluated for licensed users to add to the SSPR-Enabled-Users security group.
$OUs = Get-ADOrganizationalUnit -Filter * -SearchBase 'OU=assumebreach users,DC=assumebreach,DC=local'
$OUs | Select-Object Name, DistinguishedName | Export-Csv -Path 'C:\temp\ou-list.csv' -NoTypeInformation
- Now, let's create a PowerShell script that will read the CSV file of licensed users and the CSV file of OUs, and then add the users to the SSPR security group based on their OU.
Import-Module ActiveDirectory

[array]$OUList = Import-Csv -Path '.\ou-list.csv'
[array]$LicensedUsers = Import-Csv -Path '.\m365-licensed-users.csv'

$OU = $OUList | Where-Object { $_.SSPRGroup -ne 'Added'} | Select-Object -First 1

if ($null -ne $OU) {
$users = Get-ADUser -Server "INSERT_SERVER_NAME" -Filter * -SearchBase $OU.DistinguishedName -SearchScope OneLevel

    foreach ($user in $users) {
        $LicensedUser = $LicensedUsers | Where-Object {$_.UserPrincipalName -eq $user.UserPrincipalName}
        if ($LicensedUser) {
            Add-ADGroupMember -Server "INSERT_SERVER_NAME" -Identity "SSPR-Enabled-Users" -Members $user.SamAccountName
        }
    }
   $OU.SSPRGroup = 'Added'
   $OUList | Export-Csv -Path '.\ou-list.csv' -NoTypeInformation
}
- Save the script as
Add-SSPRUsers.ps1 in a directory of your choice. Make sure to update the INSERT_SERVER_NAME with the name of your domain controller. Additionally, make sure to update the path to the CSV files in the script to match where you saved them.
4: Automate the PowerShell Script with Task Scheduler to run daily
- Open Task Scheduler and click on Create Basic Task.
- Name the task Add SSPR Users and click Next.
- Select Daily and click Next.
- Set the start date and time for the task to run and click Next.
- Select Start a program and click Next.
- In the Program/script field, enter
powershell.exe.
- In the Add arguments (optional) field, enter
-ExecutionPolicy Bypass -File "C:\Path\To\Your\Script\Add-SSPRUsers.ps1".
- Click Next and then Finish to create the task.
Additional recommended Task Scheduler settings
Right-click on the task and select Properties.
- In the General tab, select Run whether user is logged on or not and check the box for Run with highest privileges.
- In the Triggers tab, select the trigger you created and click Edit.
- In the Advanced settings section, check the box for Repeat task every and select 1 day.
- In the Conditions tab, uncheck the box for Start the task only if the computer is on AC power.
- In the Settings tab, check the box for If the task fails, restart every and select 1 day.
Additional Considerations
- User Training: Provide training to users on how to use SSPR effectively. This can include creating a knowledge base article or a short video tutorial. Microsoft provides Self-service password reset rollout materials to assist Administrators with educating users on how to use SSPR.
- Monitor Usage: SSPR registration and usage can be monitored from the Microsoft Entra admin center by navigating to Protection > Password reset > Usage & insights. Additionally, you can monitor Audit logs related to SSPR by navigating to Protection > Password reset > Audit logs.
Conclusion
Congratulations! 🥳 You have successfully rolled out Microsoft Entra SSPR in a hybrid environment using PowerShell. This approach allows you to gradually add users to the SSPR security group based on their OUs, making it easier to manage and control the rollout process.