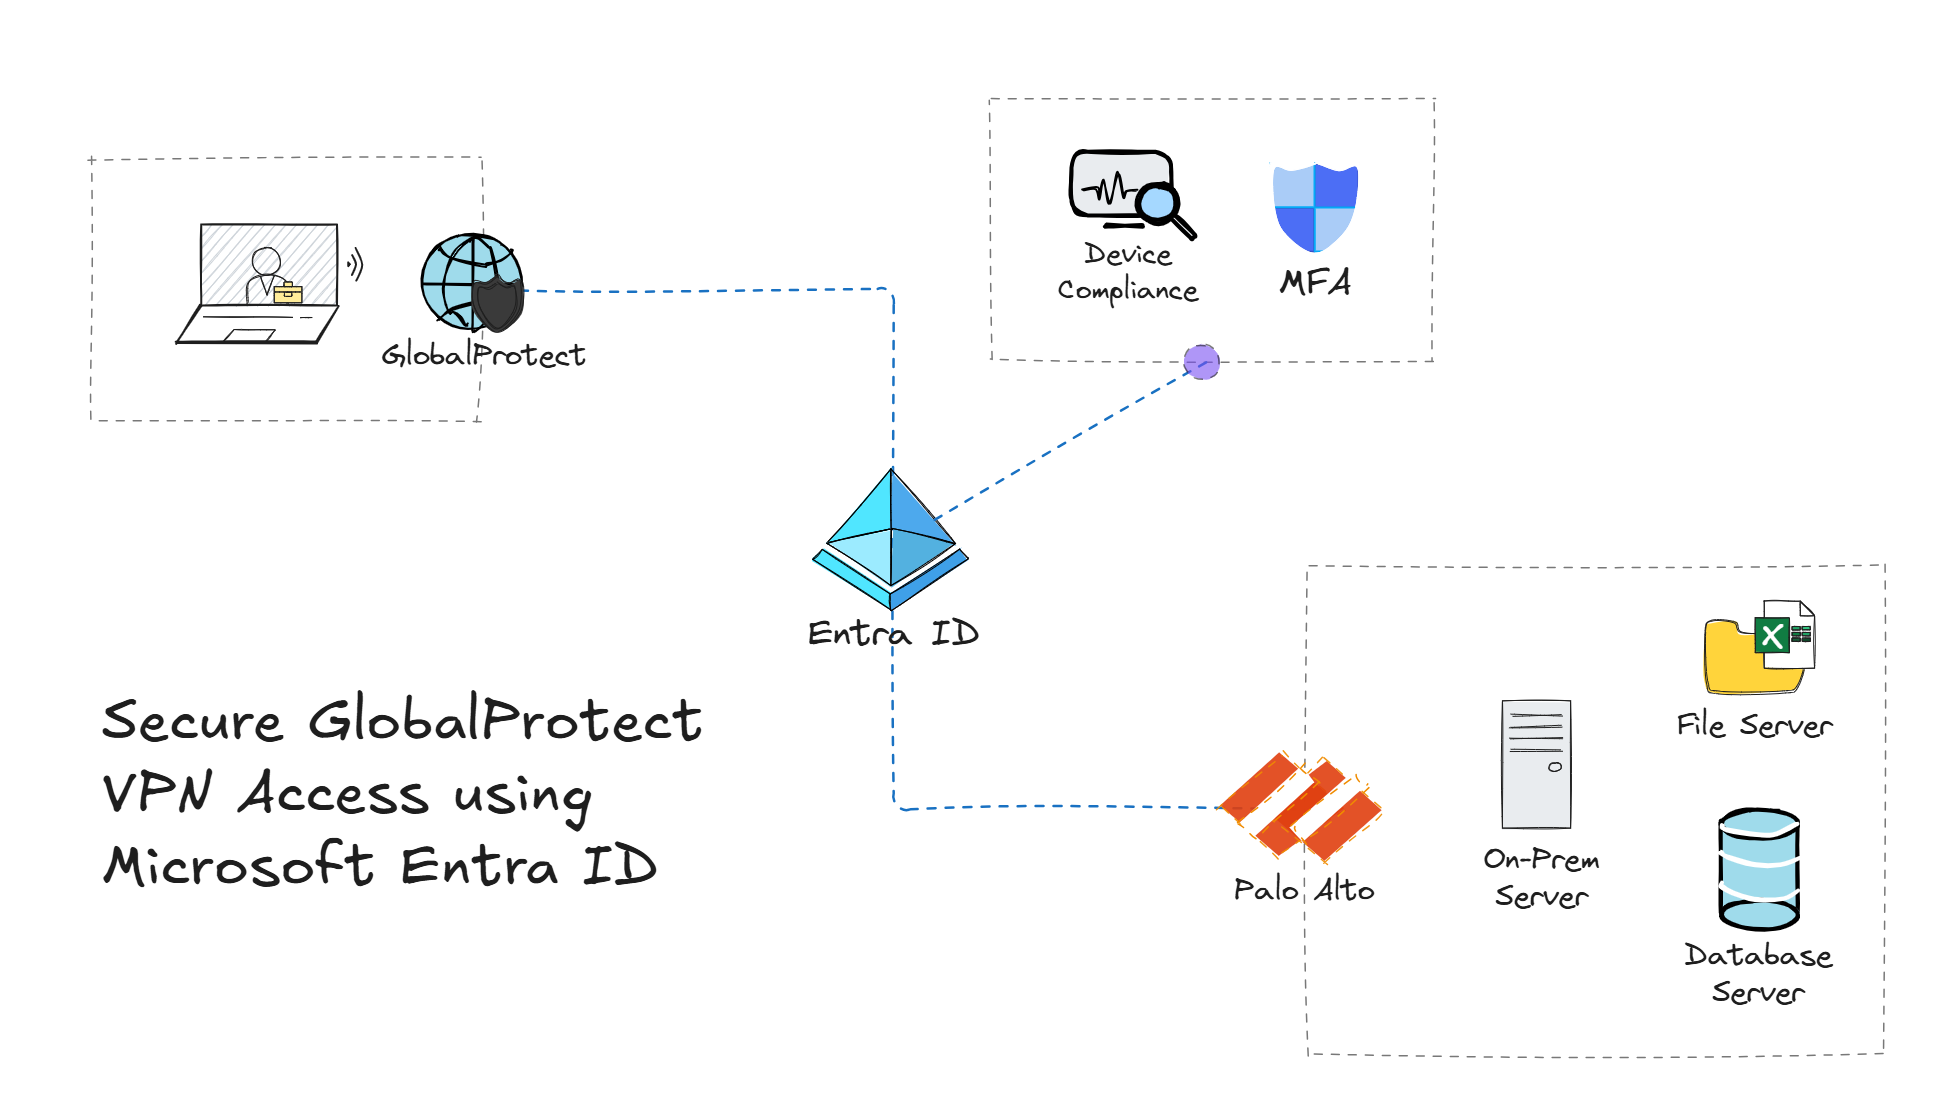
Traditional environments using Palo Alto GlobalProtect for VPN access have relied on using methods such as usernames and passwords, as well as certificates to authenticate users. However, in a Zero Trust world, it's important to verify explicitly, enforce least privilege, and assume breach. This is where Microsoft Entra ID comes in - enabling organizations to secure GlobalProtect with Single Sign-On (SSO) and Conditional Access (CA) policies.
Overview
This guide walks you through securing Palo Alto GlobalProtect VPN by using Microsoft Entra ID to enable SSO and enforce Conditional Access policies. Along the way, we'll cover topics such as creating an Enterprise Application in Entra ID, configuring GlobalProtect to authenticate users against Entra ID, and setting up CA policies to force multi-factor authentication (MFA), as well as require devices to be compliant before a VPN connection is established. If that sounds like your kind of party 🥳, then let's get started.
Prerequisites
- Microsoft Entra ID P1 or higher (to configure Conditional Access policies).
- At least a Cloud Application Administrator role in Entra ID.
- Palo Alto GlobalProtect: Ensure you have a Palo Alto GlobalProtect VPN setup and running (in this walk through, we'll spin up an instance of a Palo Alto firewall in Azure).
Step 1: Create an Enterprise Application in Entra ID
Although not included in the help tips provided by Microsoft, make sure to include :443 when adding values for Identifier (Entity ID) > Add identifier and Reply URL (Assertion Consumer Service URL). Omitting port 443 will cause SAML authentication to fail, so be sure to include it.
- Navigate to the Microsoft Entra admin center.
- Select Applications > Enterprise Applications from the left-hand menu.
- Click on + New application.
- Search for Palo Alto Networks GlobalProtect and select it.

- Click Create to add the application to your tenant.
- From Palo Alto Networks - GlobalProtect Enterprise Application, click Single sign-on > SAML.
- Under Basic SAML Configuration, click Edit and enter the following values:
- Sign-on URL:
https://<your-firewall-domain>
- Identifier (Entity ID) > Add identifier:
https://<your-firewall-domain>:443/SAML20/SP
- Reply URL (Assertion Consumer Service URL) > Add reply URL:
https://<your-firewall-domain>:443/SAML20/SP
- Click Save.
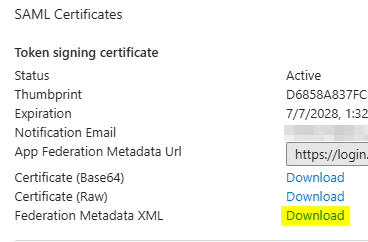
- Download the Federation Metadata XML file from the SAML Certificate section. This file will be used to configure GlobalProtect.
Optionally, restrict access to the application by assigning a specific security group to the application. To do this, navigate to Users and groups in the left-hand menu, click Add user/group, select the desired group, and click Assign. For example, assign users to a group such as vpn-users to restrict GlobalProtect access.
Step 2: Add a SAML Identity Provider Server Profile in Palo Alto
- Navigate to the Palo Alto web-based admin portal.
- Navigate to Device > Server Profiles > SAML Identity Provider.
- Click Import to import the Federation Metadata XML file downloaded earlier.
- Enter a Profile Name for the SAML Identity Provider Server Profile Import (e.g.,
EntraID-SAML).
- Under Identity Provider Metadata, select the XML file downloaded from Entra ID.
- For the sake of the demo, Validate Identity Provider Certificate is unchecked. However, in production, the certificate should be validated.

- Click OK to save the SAML Identity Provider profile.
Step 3: Create an Authentication Profile
- Navigate to Device > Authentication Profile.
- Click Add to create a new authentication profile.
- Enter a Profile Name for the profile (e.g.,
GlobalProtect-SAML-Auth).
- Under Authentication > Type, select SAML.
- Under IdP Server Profile, select the SAML Identity Provider Server Profile created earlier (e.g.,
EntraID-SAML).
- Under Advanced > ALLOW LIST, select
all only if access is already restricted by Entra ID security groups assigned to the Enterprise Application. Otherwise, select the specific group(s) you want to allow.
- Click OK to save the authentication profile.
Step 4: Update GlobalProtect Portal and Gateway Configurations to use SAML Authentication Profile
Historically, organizations have opted to set Allow Authentication with User Credentials OR Client Certificate to No; however, since this configuration will use a CA policy to enforce MFA and verify Entra hybrid joined or compliant cloud-native machines, Allow Authentication with User Credentials OR Client Certificate will be set to Yes in the scenario outlined in this guide.
Remember: the goal is to get away from doing things such as uploading certificates with plain text passwords into Intune. 😉
Update GlobalProtect Portal
- Navigate to Network > GlobalProtect > Portals.
- Select the GlobalProtect portal you want to update (e.g.,
GP-PORTAL).
- Under Authentication > Client Authentication, either update an existing profile or create a new profile using the SAML authentication profile created earlier (e.g.,
GlobalProtect-SAML-Auth) and select it under Authentication Profile.
- Click OK to save the changes.
Update GlobalProtect Gateway
- Navigate to Network > GlobalProtect > Gateways.
- Select the GlobalProtect gateway you want to update (e.g.,
GP-GW).
- Under Authentication > Client Authentication, either update an existing profile or create a new profile using the SAML authentication profile created earlier (e.g.,
GlobalProtect-SAML-Auth) and select it under Authentication Profile.
- Click OK to save the changes.
- Commit the changes to apply the new authentication settings.
Time to apply some Zero Trust principles. 🔐
Next, we'll configure CA policies in Entra ID to enforce MFA and ensure that only compliant devices can access the GlobalProtect VPN.
Create a Conditional Access Policy Requiring MFA for GlobalProtect
In an ideal environment, MFA is being enforced for all users; however, if not, it is especially important to enforce MFA on critical resources such as VPN access.
- Navigate to the Microsoft Entra admin center.
- In the left-hand navigation pane, select Identity > Protection > Conditional Access.
- Click + Create new policy to create a new Conditional Access policy.
- Give the policy a name (e.g.,
GlobalProtect-MFA).
- Under Assignments > **Include, select All users. Be sure to exclude your Break Glass account from this policy to ensure you can always access the environment.
- Click Exclude > Select Users and groups and add your Break Glass account.
- Under Target resources > Include > Select resources and choose Palo Alto Networks - GlobalProtect under Select.
- Under Conditions, configure the conditions for the policy (e.g., device platforms, locations).
- Under Access controls, select Grant and choose Require multifactor authentication and click Select.
- Click Create to save the policy.
Create a Conditional Access Policy Requiring Compliant Devices
- In the same CA policies section, click + Create new policy.
- Give the policy a name (e.g.,
GlobalProtect-Compliant-Devices).
- Under Assignments > Include, select All users. Again, be sure to exclude your Break Glass account from this policy.
- Click Exclude > Select Users and groups and add your Break Glass account.
- Under Target resources > Include > Select resources and choose Palo Alto Networks - GlobalProtect under Select.
- Under Conditions, configure the conditions for the policy (e.g., device platforms, locations).
- Under Access controls, select Grant and choose Require device to be marked as compliant and Require Microsoft Entra hybrid joined device. Make sure that under For multiple controls you select Require one of the selected controls and click Select.
- Click Create to save the policy.
Confirm GlobalProtect CA Policies are Working as Expected
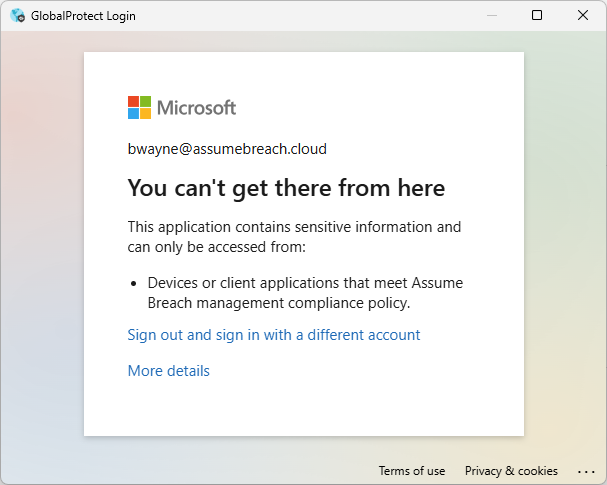
Let's verify that GlobalProtect VPN access is denied to a user that doesn't meet the device compliance requirements.
First, the user is prompted with an MFA challenge; however, the user is subsequently denied access and presented with a message indicating: This application contains sensitive information and can only be accessed from: Devices or client applications that meet [tenant name] management compliance policy.
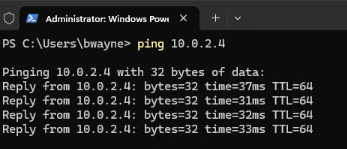
Next, let's verify that a compliant device is granted access to GlobalProtect.
As expected, the user is prompted with an MFA challenge; however, this time the user is granted access to GlobalProtect and can successfully connect to the internal network via the VPN. We can verify connectivity by sending a ping request to one of the interfaces on the Palo Alto firewall.
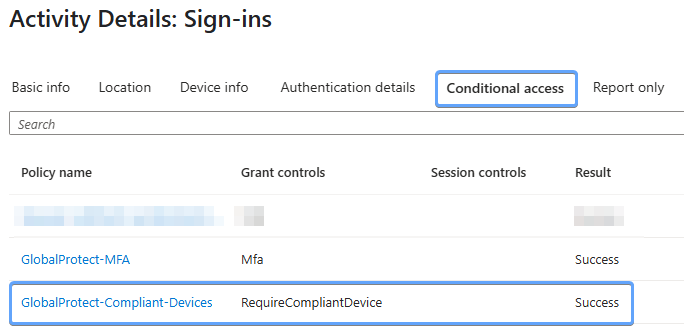
How do we know the Conditional Access policy was enforced, and that the device's compliance was validated before allowing access? 🤔 Let's check out the sign-in logs.
If we navigate to the sign-in logs in the Microsoft Entra admin center, and expand the sign-in details, we can see under the Conditional access tab that Grant controls specifies RequireCompliantDevice and the result is Success.
Conclusion
By following the steps outlined in this guide, you have successfully secured Palo Alto GlobalProtect VPN access using Microsoft Entra ID SSO and Conditional Access policies. This setup not only enhances security by enforcing MFA on GlobalProtect access, it also allows organizations to add an additional layer of protection (defense in depth 🦾) by enforcing device compliance prior to granting access to internal network resources.